Wed Feb 13, 2008 9:44 am
The Santa Barbara club is putting on a contest soon that teams up newer pilots with seasoned vets. The contest is divided into two parts, duration and XC.
Generally speaking, the idea is for the vets to have their newbies fly farther and longer than the other team's newbies. So with that in mind I thought I'd write up a little tutorial on flying XC in Santa Barbara. Hopefully, a local or two will jump in on the comments page and add a few things.

Flying XC in Santa Barbara is not unlike flying the Sierras from Walt’s Point in that you take off, turn left, and work the next spine down the range; there isn’t a lot of decision making involved. But like the Owens, some spines are more important than others so I thought I’d take the time to point them out and to discuss some of the strategies I use to head down range.
First of all, launch: getting up above it is nice, but not all that important. If I’m not at least maintaining altitude after my first 360 I’m gone. And, if I’m at the back of the launch line and I see that the Thermal Factory is working I’ll just head straight over to it and not bother with the stuff near take-off. Sometimes we get an early east flow, so instead of going directly to the TF you might want to head to the Holy Hills first if you’re not getting up at launch with the idea of using the RR as the starting point east.

Generally, the first question that comes to any XC pilot’s mind is how high does one need to be in order to head to the next spine down range? Of course that is going to vary depending on pilot skill and risk tolerance, but until you reach Noon Peak and the start of the Casitas Pass, 4k seems to be more than a safe altitude to continue on for the Santa Ynez range.
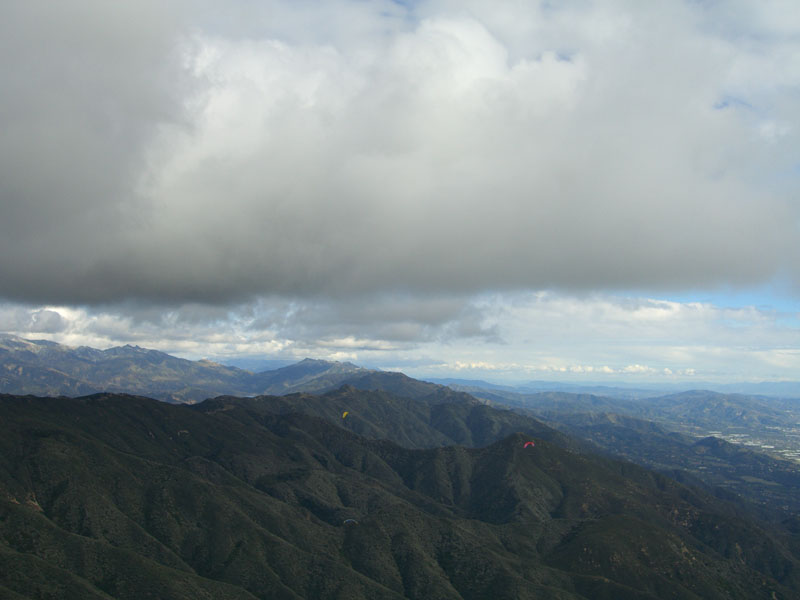
The gap to Montecito Peak (right above the red PG) Photo: Fly Above All
So now you’re above 4k on top of the TF getting ready to pull up anchor. If you’re high enough, and the general wind pattern is NW you might want to consider dropping back to the back range and then head east from there. But generally you want to set your sights on Montecito Peak. After leaving the TF you will probably encounter sink but don’t panic, about 2/3 of the way to Montecito is Shadow Peak. The thermals above Shadow are generally pretty turbulent, and for the most part, don’t take you very high, but more often than not, they will get you high enough to make it to Montecito comfortably.

The highest point of Montecito is on the west side. There is a distinct spine there, but for some reason I always have a hard time dialing into anything that will get me up and over the peak. Other pilots don’t seem to have the same problem, but I always seem to have to fall off to the lower east spine, which luck would have it, is a pretty reliable thermal generator (except when there is a NW wind; then it’s best to stay back and work the peak itself). Unfortunately, if you flush off Montecito low there aren’t a lot of landing options. These two are considered no nos, but if you absolutely needed to use them in an emergency, Westmont College and the golf course in Summerland are options.
Montecito is critical in that you want to be in a position to come into East Romero above the road cut, or at least not too much below it. Because West Romero is similar to Shadow in that the thermals are often times ratty and don’t take you very high, it’s always nice to already be high enough to get to above the road on a glide. East Romero generally works a well as anywhere else along the range, but if you come in low and don’t get up the practice polo field is well within reach as a landing option. Just a note about that though: we don’t have permission to land there so you do run the risk of getting an earful from the caretaker (whatever you do don’t land there when horses are present). The beach in Summerland is also an option along with a couple of fields directly west and east of the practice polo field.

It’s a fairly short glide across Romero Saddle to Castle Ridge. The lift on the west end of the ridge is similar to what is found above Shadow and West Romero, but things open up a bit when you reach the east end which is marked by a jagged peak. If you’re not getting up at the rocky peak it is not a bad idea to hang out a bit to wait for something to pulse through. If not, I’ve had a number of low saves above Mobile Point so you still have that option to keep you in the ball game. Just a note here: if you find yourself even with the tops of either Mobile or Castle Point its time to head out. From Castle Point the landing options include the practice polo field and Santa Claus lane. From Mobile, Santa Claus lane and, if you’re getting a good glide, Lynden Park in Carpinteria.
Immediately east of Castle Ridge the back ridgeline splits to create a shelf. Like the road cut on East Romero, it is a good idea to have the altitude to come in at least even with the top of the shelf. I don’t know if they have names but there are two points toward the east end of the shelf that work great as long as you come in above them. You really want to stop here to work the lift for all its worth. I generally find more thermal tilt here than anywhere else along the range. The lift just seems to want to take you up and over the shelf to the back ridge line. Flush off here and Lynden Park and Bailard are your LZ options.

There are two or three spines from the point above to the Power Line Crossing that generally work really well. The only advice I can give is to stop and work whatever you find. The west end of the Power Line Ridge generally works exceptionally well. Once you get up, use the back ridge as a stepping stone to Noon Peak. But beware of the sucker pop just off the east end. I don’t know how many times I stopped to work the lift in that area only to leave for Noon lower than when I started.
If you come in above the front bowl of Noon Peak you’re styling. You just need to hang out for as long as it takes for something to pulse through that will take you high enough to make a play for Divide Peak and the start of the Casitas Pass. If you come in below the front point of Noon, I recommend that you continue on to the east spine. Unless you latch onto something that you know will get you above the peak, I don’t recommend trying to work the west flank or the bowl itself. There is a knuckle on the east spine that generally works really well. If you don’t get up at the knuckle then you need to head out to land. Your options here are Balaird and Kate school, although with the latter we’re welcomed.

Although pilots have gone through much lower, 4500 ft. is probably the minimum you want before heading off to Divide. Of course, the higher you come into the west spine the better. West Divide is not a place that you want mess around; depending of course on how high you are, if you’re not climbing right away then you need to head out. But if you do find a thermal you only need to get just above the top of Divide in order to make it to Whiteledge in a comfortable position. You shouldn’t need to work East Divide, but if you find some cohesive lift, by all means stop to work it. Kate School along with some less than desirable fields along 150 are your landing options from West Divide.

From East Divide you want to aim for, well, Whiteledge, the sharp rocky spine the runs up the mountain’s west flank. You should encounter lift right before you get to the spine itself. Stop to work it and stay with it until it drifts you to the top of the mountain. On more than one occasion I have been with other pilots that have headed directly up the spine only to have to turn tail low around the front of the mountain. Foxtail Field is the landing option here. But if you’re too low to make it out there is a plateau directly below the south side of Whiteledge where you can land and then hike up to a higher point for a re-launch.

From Whiteledge you want to head directly over to Bump 3. It’s hard to tell from the GoogleEarth image, but Bump 3 is about halfway to 33 and is marked by a flat top and a red dirt face. Work this area for all it is worth so that you can come into the Topas as high as possible. Having said that, you can get pretty low on the Nuthouse spine, and the start of the Topas and still manage to keep your flight going. Also, the end of the range on the west side of 33 is sometimes good for a little boost. The Diversion Dam and wash are your LZ options.

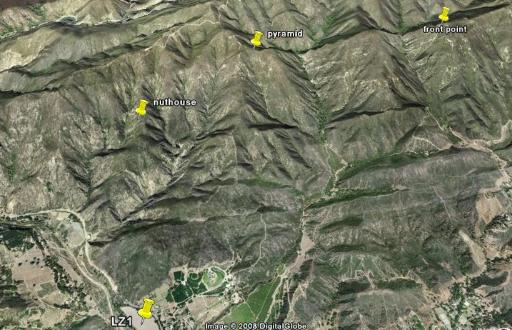
It’s tough going if you come in low on the Topas, but if you are able to hang in there long enough something will eventually pulse through to get you up and out. Once you are able to get around to the front of the Pyramid things really open up. All of the front points just west of Nordoff seem to work, however, I often find the main spine coming down from the peak itself too turbulent so I’ll skip it altogether and head directly over to Twin Peaks, even if I’m low. I have found that Three Stooges is very reliable and can count on it working to get me to the other side of the wide canyon.

As long as you can come in anywhere above it, Twin Peaks is generally going to work. More than likely you’ll at least match your highest altitude of the day. If you don’t get up then Thatcher School is a landing option but you won’t be welcomed with open arms.
Although it’s tempting, there is no reason to step back to Chief’s to see if you can get higher, most of the front point in Ojai work perfectly fine. From Twin Peaks head directly east to West and then East Repeater. If they aren’t working then you will have to fall off to the front of Boyd’s. On more than one occasion I have been below the top of the front point and have been able to hang in there until something came through to get me out of the hole. Once you get up on the front point I do recommend that you step back up to fire break that runs up toward the rocky bluffs. This area generally works really well, and more often than not I’ve gained enough altitude to go to Santa Paula Peak directly. But if you need to tank up a bit more before making the jump Puckers is right there. Something in the high 5s is probably high enough to make it to Santa Paula comfortably. From Twin Peaks on, Upper Ojai is your landing option, although I’m not sure what fields are acceptable and which ones aren’t.


From Santa Paula Peak on you’re on your own. Of course you want to be as high as possible when leaving the east end, but I really can’t say if it is better to head to the high point of Oat Mountain or out to the front points above Fillmore. I will say that the times that I’ve stayed in the mountains I found myself on the wrong side of the ridge east of Piru. For my one and only flight to the Interstate, I stayed out front both in Fillmore and Piru.

